Showing posts with label barrel firing. Show all posts

Wednesday, November 28, 2012

Barrel Firing - November 2012

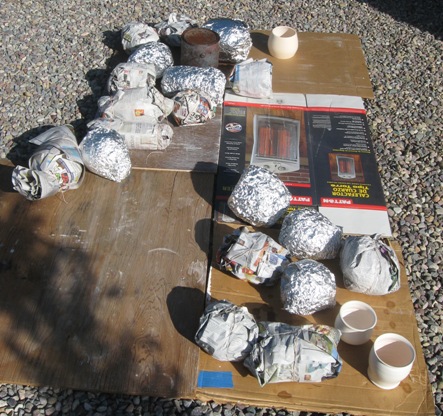
Some of the washed pieces drying in the sun

This was our second, and last, barrel firing for 2012. Totally worth the wait ! Once again we picked a perfect sunny and mild week-end for the firing. Just three of us this time, with 13 pieces total. So we packed the two barrels pretty loose, keeping the pieces in the center. One barrel had three layers, while the second barrel had two layers to accommodate a very large piece.

As usual, we started with kindling and a bit of hay at the bottom, then layered pieces with more kindling, a bit of hay, and a sprinkling of copper carbonate, iron oxide and salt in between layers. On the top, we built a little tepee out of kindling and squeezed in some rolled-up newspapers to start the fire. We also added some small pieces of newspaper through the holes at the bottom of the barrel, to start the fire from the bottom as well.

The fire started very quickly, and the smoke from the hay cleared rapidly. We soon were adding bigger pieces of wood, then oak wood after teh fire had gone for an hour. After feeding the fire for over two hours, we let he embers build up, occasionally adding more wood to make sure embers covered all the pots. Once the top layers of coals had cooled enough, we poured some sawdust on top and close the barrel with a lid, for the reduction step.

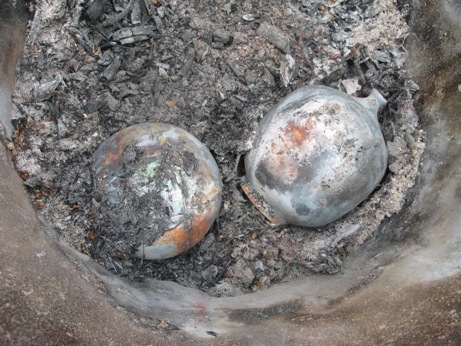
It took two days for the barrels to cool down ! But what gorgeous colors ! So much red this time.  

Rose preparing her pots

Lee and her magic Cheetos

Final touches

Lighting ceremony

Let's get that second barrel going !

On our way to beautiful reds...

Saturday, May 19, 2012

Finished pieces from the barrel firing

Now that my pieces are cleaned and waxed, I was able to take some single shots.

All four pieces were made with cone 10 half and half stoneware, burnished at the dry stage, treated with terra sigillata, and bisqued to cone 08. After the bisque firing, copper sulfate solution was applied in three coats, followed by three coats of brine solution after a day of drying. For the barrel firing, each piece was wrapped in newspaper with various organic and inorganic elements in close contact, as described under each picture.

All pieces are about 10-11 inches in height. It is a good size for our 50-gal steel barrel, three can form a nice loose layer.

copper wire, salt,
copper carbonate,
red iron oxide


The copper wire used was actually a copper scrubbie that was unfurled and fitted all around the pot like a sock. The mesh imprint is more visible on the other side of the pot. I like this side better for its dark blue colors.


coffee grounds, copper carb.
and iron ox.-soaked corn husks,
copper carbonate, red iron oxide


This is the first time I use coffee grounds. Like anything else I add, I was very generous and it transpired with a lot more grey-bronze areas. The overall colors are quite soft, even pastel, and it reminds me of colored japanese brush painting.


kelp, copper carbonate,
red iron oxide


It is pretty hard to notice that a big piece of kelp was completely wrapped around the piece. Had the piece not been presoaked with salt, the kelp would have left a more noticeable imprint. This particular pot was in the barrel that reached top temperature. As a result, the colors are richer and warmer, with more reds.


eel grass, rutile, red iron oxide,
copper carbonate, salt,
sugar/polenta/wild rice mixture


This final piece is my favorite. For the first time I used rutile, and I have yet to understand its contribution, but more yellows are present. Another interesting addition was the use of long skinny seaweed (eel grass) that was placed in tangles around the piece. It left visible marks of various colors, likely due to the different chemicals in the vicinity.

Thursday, May 17, 2012

Spring Barrel Firing

Our little group finally got together for our first 2012 barrel firing. As it turned out, the scant rain Southern California got this winter mostly fell on our scheduled week-ends. So we cashed in all our weather karma points for a gorgeous first week-end of May !
At this point, we all are barrel firing veterans. Within two hours pots were prepped and barrels were loaded, ready for Rose to officiate the Lighting. We fed the fire for two hours, using oak wood in the second hour. It was a mellow afternoon, under the shade of a big tree. By the time embers covered the top of the barrels, we had broken into a light dinner, picnic-style. Rose and Bill covered the top with sawdust in the evening for a slow cooling overnight.
The next day was filled with oohs and aahs. Interestingly one of the barrels did not fire as hot as the other. We could tell from the intact aluminum foil of some of the saggars at the bottom of the barrel. We surmised the embers did not fall all the way down to surround the bottom pots. It can happen if the loading at the top is too constrained.
But overall the firing yielded some beautiful marks on the pots.

The Stacking

The Lighting by Rose

The Feeding

The Feeding - Part 2 !

The Smoldering

The Pieces
 

Monday, September 5, 2011

Labor Day Firing

Some of our work, cleaned up and waxed
Once again our dear friend Rose opened her home and her studio for a barrel firing. For our third firing, our little group welcomed Lee, another alternative firing enthusiast (and my regular Raku partner!). Lee was a well of information, gladly sharing her prepping tips, notably her recipe for her "no fuss terra sigillata". Under her direction, Rose, Myra, and Nancy chose the "baked potato" technique where pots are treated with copper sulfate and ferric chloride and wrapped up in aluminum foil with organic materials. The results are typically variations of light pink to orange to reds. I opted for newspaper wrapping, salt, copper sulfate/carbonate, and iron oxide treatment.
Watching us on that warm saturday afternoon, you'd think we were all old pros. Wood was separated in neat piles by sizes, along with pine needles and chemicals. Wares were all prepped in two hours. Loading barely took 30 minutes, alternating between kindling, pine needles, wares, and chemicals (iron oxide, copper carbonate, and salt). Firing was textbook, feeding it for an hour and a half, reaching 1500F at the top of the firing. We even managed to squeeze a refreshing swim in Rose's swimming pool.
Getting hypnotized by the dancing flames, while sipping wine or beer under the stars, was the highlight of my day. Orange, blue, green. The chemicals were working their magic. Until the fire died and hot coals covered our pots. Once the coals were a bit cooler, wet pine needles were poured on top followed by sawdust for a heavy reduction and slow cooling overnight. Probably the secret for some of the deep reds we get on our wares. Or was it the cheetos offerings Lee left for the kiln gods ???

Thursday, June 9, 2011

Perfect time for another barrel firing - Part 3

...or two days later !!!

It actually took 24h for the embers to turn completely cold. Which means a very slow cooling period, allowing plenty of time for the colors to evolve before the final colors settle. For a 50-gal drum that's considerable. It must have been the wood. Go oak !
Of course, waiting for two days was excrutiating. One day is hard enough, but two raise the anxiety level a few notches."Are my pots intact?" "Did I get good colors?" "Did I get ANY colors?" After spending countless hours making, trimming, burnishing, prepping the pots, they become a piece of you, and the separation anxiety is simply killing you. You just want to be reunited so that you can spoil them with even more care and attention.
And so, on day 3, Nancy and I drove back to Rose's with mounting anticipation. Once there I practically dove into the barrels, picking out the pots gingerly for any signs of flaws. What a fool ! It was a perfect firing. I could already tell, under the layers of ashes, that the pots had wonderful colors. A quick rinse with water and a soft brush confirmed it. After drying the pots in the sun for an hour, we proceeded with a final waxing session, with a big smile on our faces. For a job well done.

Surprises in barrel #1

Surprises in barrel #2

Ashes all washed away

Final touch with love from Rose

Nancy loved her pieces


 And here my pieces, waxed up and ready for their close-up.

11"x6" Vase
copper sulfate, copper carbonate, red iron oxide,
salt, miracle gro


11"x6" Vase
copper sulfate, copper carbonate, red iron oxide
salt, seaweed


11"x3" Squared Vase
copper sulfate, copper carbonate, red iron oxide,
salt, copper mesh


7"x6" Vase
aluminum saggar, copper sulfate, ferric chloride, salt,
sugar, corn grits, wild rice, raffia

Tuesday, June 7, 2011

Perfect time for another barrel firing - Part 2

Part 2 of our barrel firing week-end. All our wood was ready, neatly piled by wood sizes, from kindling to oak. Pots were all wrapped up, some in newspaper, others in aluminum foil. Time to stack the barrels!
Kindling and straw provided our first layer on top of which we proceeded with a layer of pots, followed by more straw and kindling. A little sprinkling of iron oxide, copper carbonate, and salt, then more pots, repeating layers until we reached the top.

Time to load !

Bottom layer

Layered pots

Top layer

A little pow-wow
 A bit of kindling, some lighter fluid, and gentle fanning was all that was required to get the fires started. One of the barrel produced a lot of smoke initially then subsided once the straw was all burned off. We surmised it was still a bit wet from the late rainy weather. We continued feeding the fires for about 2 hours, by adding bigger and bigger wood. Ultimately we used up all our stacks, with medium size oak logs put last for a slow burn. We moved a pyrometer around checking out the temperature at the base of the barrel where holes had been drilled for air supply. Not surprisingly, we noticed big variations while the wood was burning, with embers falling down inconsistently here and there. Readings were between 600 and 1200F ! But that was ok, because the top temperature is reached more evenly when the wood has all turned into hot embers surrounding all the pots. That was when we added sawdust on top to act as a plug, thus creating a reducing atmosphere while the embers are slowing cooling down.
It is fascinating to watch the fire dance on the logs. Once it gets hot enough, some chemicals are starting to melt and burn off, releasing streams of colors, notably various greens and some deep blues. That's when the magic of the firing is starting to weave its spell...    

Starting the fires

So pretty !

Thursday, June 2, 2011

Perfect time for another barrel firing - Part 1

At last another barrel firing at Rose's ! Bad weather and scheduling conflicts have been conspiring to prevent our little troupe to get together for our second barrel firing, but we finally caught up with each other and timed it perfectly with a beautiful day this Memorial Day week-end. We have learned much from our first firing, and we were ready.
The day unfolded in a regimented manner. First things first, we had to prepare our pieces. Under a large old pepper tree, we installed our chemical station, with large plastic tubes and grilles for pouring solution on top of our bisqued pieces. Our choices today: copper sulfate (4 tsp/gal) and ferrous sulfate (3 tsp/gal). Solutions were poured 3 times, letting the bisque absorb the liquid in between. Some pieces got both solutions poured on. Then they were let to dry in the sun for an hour. Some pieces also got an extra layer of commercial ferric chloride solution brushed on (Radioshack etchant solution), leaving the piece yellow.

Rose and Myra treating their wares

Nancy pouring Ferrous Sulfate

Rose and Myra applying Ferric Chloride

Drying downtime

Once the pieces were relatively dried (an hour in the sun), the fun really started. A teaspoon of copper carb here, a teaspoon of iron oxide there, some dried seaweed, oxide-soaked corn husks or cloth strips, a sprinkle of sugar/polenta/wild rice mix, salt, copper wire, whatever was in the boxes in Rose's studio. Get a few potters together in a room and creativity takes over. The energy was high, the anticipation ever higher. "What would happen if I...?" "Let's try it !" "We need more seaweed !"
Nancy's pieces, mostly thin slabs, were quite fragile. Bill kindly built nice little cocoons of chicken wire to protect them from the weight of burning logs. It is a great trick that has served us well, including lids and other small parts that would be too hard to find in the ashes.


Time for packing

Nancy in a creative moment

Bill on caging duty

Myra and Jim getting into it
Rose's studio turned into a burstling factory. Wrapped pieces were piled outside by the drums. Pieces treated with ferric chloride were wrapped in aluminum foil instead of newspaper, due to the corrosive nature of the chemical. We prepared those pieces in an analogous manner to the "baked potato" method of Eduardo Lazo (see February posts). However, the Lazo's method calls for a firing temperature of 1400F in a gas kiln. The wild temperature variations in a barrel were a big unknown. Will we get similar effects ? Different effects ? Anything exciting or plain dull ???
Well, the stage was set, with piles of wood of different sizes, starting with kindling and ending with big oak logs. I'll cover firing and results in my next posts ! 

Almost there !
The stage is set

Monday, January 10, 2011

How a pit turned into a barrel

Remember those bisqued pots in my previous post ? Here they are, after an absolutely thrilling barrel firing. An amazing display of colors, don't you think ?  With the help of some copper sulfate, copper carbonate, red iron oxide, a bit of rutile, salt, seaweed, mandarine peels, and coffee grounds, to name a few.


It was another overcast and cold day in San Diego, even colder in Alpine. Weeks of rain have drenched the soil, turning our pit into a frog pond ! But my friends Rose and Myra were undeterred. They found a recycled oil drum and two metal trash cans, drilled a few holes at the bottom, and our pit firing turned into an improvised barrel firing. I love it !
Nancy and I drove to Rose's on Saturday afternoon to prepare our pots and start the firings. At our disposal: oxide-soaked strips of old T-shirts (red iron oxide, copper carb.) or corn husks, salt-soaked pine needles, iron oxide soaked twine, seaweeds, oxide powders, coffee grounds, Kosher salt, various plant cuttings,...Tieing, wrapping, sprinkling, it was a flurry of activity in the studio, the air saturated with creative vapors. The most fragile pieces were caged for protection. Good thinking !

Nancy, Rose and Myra
All wrapped up and ready to go
Next, load and fire. Pieces were piled into the three "barrels", alternating layers with straw, woodchips, salt and oxides. I don't know how we managed to fit it all, but we did ! Rose inaugurated our first barrel firing by lighting the first match **Drumrolls** Fires roared and pieces of wood were added for an hour, while we celebrated with cold beers. Then we let the combustibles burn out slowly. It was finally time for a light dinner by the fires, under the stars, warm and the belly full.


It took the whole night for the fires to die down. By early morning, it was all cold ashes, pots peaking through, ready for unloading. It was hard to wait so long ! I am so used to the instant gratification of Raku firings. The excitment was hard to contain, sleep was light and short. But I wasn't alone in that predicament. When Nancy and I showed up the next day, Rose and Myra had already dug up a host of treasures. Splashes of colors were already shining through the dust. A good sponging, a thorough waxing, and a quick buffing revealed a magnificent array of colors on most of our pots. It was a great firing !


My first barrel firing, it was such a thrill ! Hardly any breakage, beautiful colors, everyone did an awesome job. Rose, Myra, and Nancy, mission accomplished ! Thank you Rose for opening your house and your studio to the crazy potters that we are ! I can't wait for our next barrel firing !