Back from Idyllwild, CA ! Richard Burkett, professor of Ceramics at SDSU, taught a fantastic week-long class on cone 6 glazes during the the Adult Summer program at the beatifully located Idyllwild School of Arts. Surrounded by pines trees, oaks, squirrels, and a multitude of birds, a small group of 10 people dove head first into the world of glazemaking, firing test tiles every day, mostly cone 6 oxidation in an electric kiln. Richard was very generous in his knowledge. First he shared his glaze software, Hyperglaze, with all of us. Hyperglaze is a great tool for calculating unity formulae and prepare new recipes. Then he covered the basics of making glazes, and revealed tricks and tips to solve the typical galze issues (running, crazing, shivering, pinholing, you name it) and transform a glaze into a winning color.
 |
The class (L. to R.):
Sandra, Pierre, Elizabeth, Harriet, Merle,
Janette, Richard, Emily, Danae, Debby, Lavanya |
I came to Idyllwild with three dear San Diego friends, Merle, Sandra and Danae, all with various expectations, from learning how to mix glazes to how to create a new glaze. There we rekindled with Harriet, whom Merle, Danae, and I had met last year at the Soda Firing workshop. And we made new pottery friends in the process. That's how it works at Idyllwild ! Oh, and the food on campus was excellent. Buffet style, and ice cream every day. And those almond cookies were to die for !
 |
| The workbench |
 |
| In the glaze room, weighing and mixing |
 |
| The girls at work |
 |
| The first round of tests |
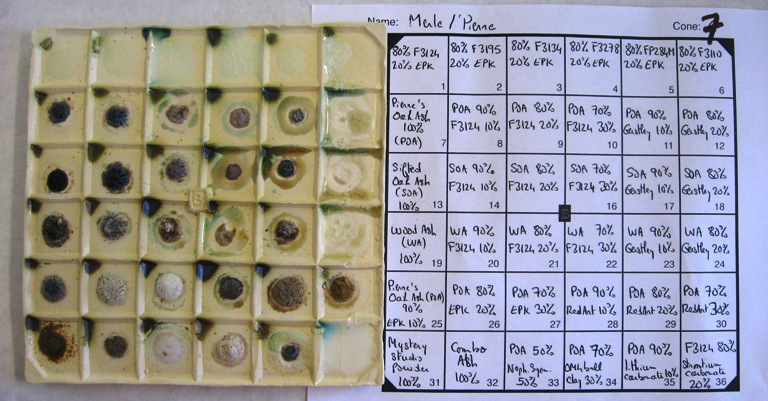
Overall, I think we all met our goals. Personally, I was interested in learning the process of creating a glaze from any kind of ashes. Ashes contain all the ingredients necessary for a glaze (fluxes, alumina, silica), it is simply a matter of finding out the right melting combination. I had brought some oak ash, previously sieved. A melt test with different fluxes and frits narrowed it down to a basic recipe to explore. Tweaking the melt to give a stable glossy glaze at cone 6-7 was then quickly achieved with the help of silica and EPK. With a recipe in hand for my oak ash, I can now explore different colors with oxides and stains, as well as varying the opacity of the glaze. Exciting !
 |
| Ash melt tests |
 |
| Oxide line blends |
The class also gave me the opportunity to try out new glazes from the a few books I brought, thanks to the full access of chemicals at the ceramics studio. That's more than what I have at home, but I know now what else I should procure for my own studio. Notably a particularly useful barium frit, Ferro Frit fb284m, which alleviates the manipulation of the harmful barium carbonate.
 |
A new glaze:
Pierre's strontium aqua |
 |
Oxblood glaze revisited
(cone 6 oxidation) |
Hyperglaze turned out to be an invaluable tool in creating new recipes from unity formulas. Jordan, Richard's assistant for the week, tirelessly updated the sofware with our new creations, including pictures of the test tiles to match. I am already using the software to tweak some recipes that have been eluding me. Yes, you, cone 10 gas-fired glazes, I'll find a way to get you !